Search This Blog

Thursday, September 8, 2016

Bitx3C SBL1 In Black Case

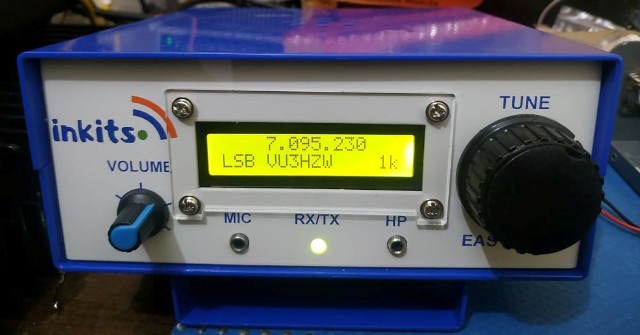
Quite some time back I had built a Bitx3C SBL-1 with a DDS. Now this DDS has a S.Meter and can be used for 3 bands. presently this rig is for 20mt only using the SBL-1 mixers.
Performance has been great with many contacts been made.

This new DDS will be offered with the Bitx Kits starting this month.
Here are some pictures which I had taken for the Bitx3C SBL-1


Bitx3C SSB TCVR 6 WATTS SSB

BITX3C EXCITER-DDS-AGC 
                             
BITX3C VIEW EXCITER,DDS,AGC,AM AND PA

BITX3C PA 

BITX3C RAER SIDE 

BITX3C FRONT 


Tuesday, August 9, 2016

NEW BITX AGC Adjustments Updates

Lately many Hams who purchased the AGC kit with our Bitx Kit were having some problem in adjusting the
VU meter to get a deflection. After observing the problem sometimes at my end too i decided to study what would be the correct sequence to set the VU meter.

The setting of 2 trimmers R3A And R5 were found determining the initial settings of the VU meter.
After doing some adjustments with R3A And R5 the correct settings were found as to my way, there can be other ways too.

Below I have provided a silkscreen picture of AGC and short notes to be followed in sequence.
I hope this should help many struggling with setting their meter to move and complete their AGC.

Any one can contact to me if he find still his AGC is not working.

Now Please follow the setting of AGC Meter as below.


AGC ADJUSTMENTS UPDATED

First disconnect antenna from the transceiver or any receiver being used with the AGC module.Also switch the AGC module off from the power source.

 Now follow the steps below in sequence to adjust the AGC settings below:

 STEP 1:
Set point A and B as shown in Fig 1:  AGC silkscreen with trimmer R5 (5K) to 4.9k by tuning the trimmer anti clockwise, use any DMM for this setting. The multi meter leads to be connected between point A and B. We need more adjustment with this trimmer later on. Steps to be followed in sequence leave it at this setting for now.


 STEP 2:
Set point C and D as shown in Fig 1: with trimmer R3A 50K to ZERO 0 ohms by tuning the trimmer clockwise,
 use any DMM for this setting. The multi meter leads to be connected between point C and D, we need more adjustment with this trimmer later in steps to be followed in sequence.


 STEP 3:

Now connect +12 Volts power to AGC, and adjust trimmer R4 (50K)
To get 4V at IC LM324 PIN 3.  Power off the AGC, we shall switch power on later.


 STEP 4:

Now connect meter pads positive and negative as indicated in the Fig 1:
Silkscreen Layout of AGC with wire’s to the VU Meter negative and positive terminals.


 STEP 5:

Now as the meter is connected with the AGC circuit, power on the AGC,As the AGC is powered the meter will now show full scale deflection towards forward even crossing the scale, now adjust trimmer R3A (50K) so that the meter is within the scale limits to the maximum possible.


           The meter is at max forward position

 STEP 6:

Now adjust R5 (5K ) to get meter to show near to zero reading on the meter, but not   absolute zero reading, this setting can be adjusted later to see how the meter responds to a signal. If you see a slack movement move the setting above a bit zero. This can be tried with trail and error to see at which point the meter is excited best.


The meter setting has been bought near to zero with adjusting R5 (5)

                                                Optimum Zero position for VU meter set


STEP 7:

Now is the time to connect the antenna to your set, tune for a strong signal and adjustR3A (50K) to show Full Scale meter reading.


 STEP 8:

Now adjust AGC level with R7 (2.2K) for a Comfortable Audio.


 STEP 9:

Finally Adjust R3 (10K) for VU Meter movement NOT to jump, but show rather
Steady levels.


 AND THAT’S IT ………


Thursday, July 14, 2016

All About Bitx Version 3 Series.

Lately I have been asked about our Bitx 3 series transceivers if they are for single band or multi band and what difference our Bitx Kits have between our various versions.

Here is a question I received recently from one of our Radio Amateur member by email.

Hello.
I am looking for the latest model of the Bitx that can work digital modes.
I must admit, I an unable to understand what are the Bitx's versions: Is it a single band QRP TRC, or is it multiplicand TRC with LIN Amp, and what is the latest model.

73
 Mike
 4X1LM


Our Answer to the questions:

The Bitx version 3 series transceivers  we are selling are all mono banders i.e. single band ssb qrp tcvr. 

The First Bitx kit we started was "Bitx Version 3" ;From the original design of OM Ashar Farhan, Bitx20, further with minor modifications,which were done by Om Rahul Srivatava VU3WJM. 

Later we came out with some new versions Bitx3B Bitx3C with mods done by us. 

1. Bitx3B this version has some changes like the VFO is now controlled and integrated with the famous IK3OIL FLL.  So the VFO is now with varactor control tuning, using 1sv149 varactor diode, which can cover 350KHZ. The mic amp has an extra pre amplifier added. 

Some minor changes were done in PA switching TX RX; overall it has been improved upon the older Bitx Ver 3. The Ver 3B also uses the Diode Ring Mixers and Toroids, in the product detector and mixer.

2. We have Bitx version 3C, which are in two versions.

a. Bitx3C using ADE-1 Mixers.

b. Bitx3C using SBL-1 Mixers.

Other features are same as Bitx3B.


3. AGC and Audio Mute stages have been added in Bitx3b Bitx3c 

For digital modes you can use the Bitx3C SBL-1 or Bitx3C with ADE-1 mixers.

Hope I have been able to clear your doubts.


Saturday, July 2, 2016

Error In CD files sent with Bitx3B kit

Lately we had started offering CD instead of printed documents for Bitx series constructional manuals.
Some how the CD sent had docs with some missing pictures in the file bitx3b construction manual, we
regret that, we are trying to offer the printed documents again so that the mistake does not occur again.

Most of the Bitx3B files can be found on the Bitx Yahoo Forum too.
This link below is okay and the documents seem to be good.

https://app.box.com/s/6g5rj15kgpft1mqxkg7h

Very soon we would work on making all files online with fully correct manuals.

best of 73s

Wednesday, May 4, 2016

BITX3C SBL-1 40MT BAND SSB TCVR

The modular Bitx3C SBL-1 kit for 40mt band  is going to be sold very soon from our ebay store as it has been completed

Publishing some pictures that were taken recently. 

More details and additional info will be mentioned soon.
BITX3C SBL-1 40MT SSB TCVR


BITX3C SBL-1 40MT SSB TCVR


Monday, March 28, 2016

New Kit: JBOT HF Linear Amplifer

After a gap of long time I have been able to bring out a new kit, from our most popular author Ashar Farhan's collection. Yes its the JBOT kit.

The JBOT has been tested on our designed PCB and works extremely well.
We have used 2N2218, earlier we used 2N2219 which had an higher gain and was giving some problem, but we have found 2N2218 more suitable and also as suggested in JBOT article.

We got a pack of 500 transistors 2N22I8 and so we are glad that we can offer transistor that have  been tested and do not oscillate.

We changed just 2 resistors value  as per the need of the gain of the transistor, and the complete kit was build as per the article.

Kindly find pictures attached below:

JBOT HF Linear Amplifier 

JBOT HF Linear Amplifier kit

Printed Circuit Board JBOT Front

Printed Circuit Board JBOT Rear
This kit can be purchased from our ebay store.

Buy JBOT kit from our store

Only Available in Kit form.


Featured Post

   My Journey with Amateur Radio: Sunil Lakhani (VU3SUA) Shares His Story Hello, fellow radio enthusiasts! This is Sunil Lakhani, also known...