Search This Blog

Sunday, June 18, 2017

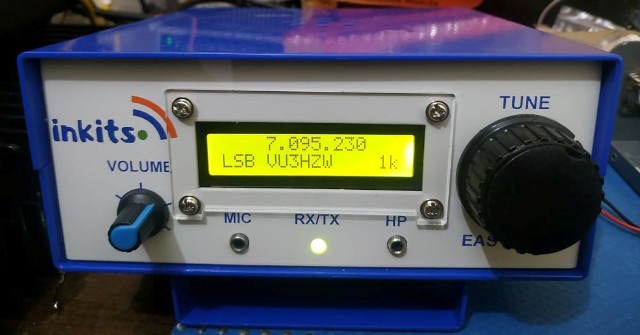
Taurus Delux 20mt SSB/CW receiver video

The Taurus 20mt receiver is working great and I  have monitored the band with many receivers
which are being calibrated with minimum adjustments.

We would like to know if you would like a kit for Taurus? We can also make it for other bands like
40mt or dual 20mt and 40mt. It all depends on what feedback we get.

The Taurus 20mt receiver is available from our ebay store and will also be available from our website.

Our ebay store link for the Taurus 20mt receiver is as below
http://www.ebay.com/itm/Taurus-Delux-20mt-SSB-CW-Receiver-/132224485750?hash=item1ec9318976

I did monitor and record some video too. here is one on our you tube channel.More video soon.


Kindly send us your suggestions if you want the receiver with case and counter, or bare bone RX only?


Monday, June 12, 2017

Taurus 20mt Receiver SSB/CW

Some new kits have been developed by us and are ready to be provided to our customers.

There seems to be a considerable demand for working kits, so we have developed TAURUS DLX
20mt SSB/CW receiver.

The Taurus 20mt receiver works with a single chip MC3362 this RX had been very popular a few years back, we have modified some stages and bought in a kit form working type and the kit type which shall be
available soon, the working Taurus for 20mt will be available from our ebay store and our website.

The Taurus 20mt covers the complete band from 14.000 to 14.350 and the RX performs optimum.
It has also an inbuilt AGC which can be tweaked accordingly. The audio amplifier consist of TDA 7231

Presently the Taurus comes without a case but soon we shall be adding a case to it.

TAURUS DLX 20MT SSB/CW RECEIVER 


                                                         TAURUS RX BEING TESTED
TAURUS DELUX 20MT KIT 


Sunday, May 14, 2017

Mounting BITX 40 SMD On Bitx3b Case

We are selling our BITX metal case in various colors, these can be used for our
bitx models like bitx3b 3c etc, these are also good for bitx 40 smd.

Explained below is the method of how you can mount the bitx 40 smd
using our bitx3b case as below.

STEP-1 

Place the bitx 40 pcb in center of the 4 holes which are actually meant for the
bitx3b boards.

Now take a marker pen with a thin and long tip, and make circles inside
the pcb mounting holes and then make new 4 holes on all the 4 mounting holes with 
a suitable drill. If you can not make holes yourself then ask a friend or seek professional help.


                                           Mounting holes for BITX 40 board 
    

                                Mounting holes for BITX 40 board 


                                  Screws secure on the brass spacers


STEP-2 

In the second  step we mount the bitx40 board on the brass stands and secure them with the nuts on 
all four brass stands.
                                                   
   Bitx 40 board mounted on the bottom cover case
                                         
    Bitx 40 board mounted on the bottom cover case

So in easy  two steps we have mounted the Bitx 40 board on the metal case for our 
bitx case.

If you do not wish to make holes on the case then there is a second option of cutting a piece
of copper board and mounting that on the bitx3b case on the pre drilled holes and after that making
4 holes for the bitx board on the copper sheet and mounting the bitx 40 board on the copper sheet with brass stand stands.

The advantage of using our case is that you get sufficient place for adding any other add on circuits
like audio mute control, agc and an extra linear amplifier.

Further we are coming out with some new models that should solve the drilling holes on the
case for bitx 40 smd.

Kindly note we are not in any way selling or servicing bitx40 smd kits. 


Wednesday, April 12, 2017

New Colors Bitx Case

Two new colors for Bitx Case have been bought into our inventory and are available for sale
from our ebay store and our website 

The two new colors are Black Glossy And DA Grey Glossy.

Hope you would like these two new colors, the case can be used for Bitx 3b3c and for Bitx40 smd.

BITX CASE GLOSSY BLACK


BITX CASE DA GREY 


Saturday, April 8, 2017

Bitx from Russia

In our previous post about Bitx from Russia, we had mentioned Nikita building the Bitx 20 3C.

Nikita had promised to send the pictures of his completed Bitx once it was built.

So here are some word from Nikita himself on his Bitx.

Hello my dear friend! I finished the project bitx 3c sbl-1 20 mt. As promised, I send you some photos of the finished design of the transceiver. Most likely I have mistakes, but it works, and it pleases! Now I wait for some details for multiband bitx, so I'm experimenting with a synthesizer. How I will achieve success I will give details."


Thanks Nikita you have done a great job and and completed your Bitx with lovely pictures of your

Bitx. Hope new hams will find your construction technique very useful and admirable.


                                      PICTURES OF BITX3C SBL-1 20MT SSB TCVR   BUILT BY NIKITA 


BITX3C SBL-1 20MT SSB TCVR 

VIEW OF BITX3C 

BITX 3C FRONT 

BITX3C VU METER AND FLL 

COMPLETED BITX3C 20MT BY NIKITA 


Saturday, March 4, 2017

Amateur Radio Kits.In Now Working

After a gap of one year our website is back with a complete working store and a download
page for all our kits and parts.

It took me some time as I thought of building the website myself as my second hobby is of making websites and blogging.

The website will be made more customer friendly in coming days.

This website was necessary as it provides us  with more flexibility in providing info, as well
as to maintain a better shopping cart as on eBay we have certain limitations.

The site is SSL secured and you need to add an https. before the domain name.

Kindly find the link below to our website.

https://amateurradiokits.in

Friday, March 3, 2017

Vintage SSB/CW Bitx 20 From U.K

Let me present here my friends a Bitx SSB/CW 20  Vintage type of ssb transceiver built by our young friend
Mark Baldridge from U.K 

I shall put in Marks own word his experience with building the Bitx through an email sent to me.

"Sunil,

Attached are several pictures of my finished bitx.

Some key features are the laser cut/engraved faceplate, and the scratchbuilt CW Generator.

My "enclosure" was designed to make easy access for modification and troubleshooting. As well as to look like a vintage 1920s era homebuilt radio.

I have the entire rig running off a 6 cell lithium battery at 22V. 

Thank you so much for your help and great customer support through the build process. 

I have made contacts across the United States, and one CW contact into Canada.

Feel free to share the photos. Have a great evening!

~ Mark " 
wishing Mark the very best with his Bitx, hope we more of Bitx in different styles coming up.
Thanks mark for your great effort in putting up the Vintage Bitx.....


------------------------------------------------------------------------------------------------------------------

Featured Post

   My Journey with Amateur Radio: Sunil Lakhani (VU3SUA) Shares His Story Hello, fellow radio enthusiasts! This is Sunil Lakhani, also known...